


Wireless Flash Article
Updated August, 2006
I had an article published in PhotoWorld magazine (U.K.) which goes into the details of Minolta (now Sony) Wireless Flash. Below are some noteworthy examples from that article. Below the examples is the full technical article. (It gets a little technical, so if you don't care about that, just enjoy the sample photos.) Hey, somebody needs to extol the virtues of this system!!
[Note: Starting with the introduction of the Sony Alpha 900 and the HVL-F58AM flash, the entire wireless flash protocol has changed. I'll be updating this page shortly to reflect the new realities, but if you want a quick primer, check out the January 2009 edition of my newsletter.]
 |
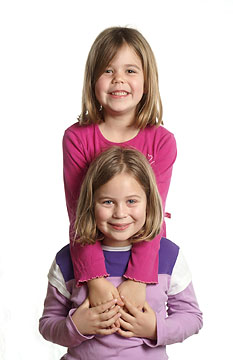
This portrait used two unmodified flashes set to ratio mode - one off-camera (2:1), the other on-camera (2:1). Everything else on automatic. |
 |
Easy Product shot. Main light above right set to 2:1, 2nd flash illuminating wall set to 2:1. |
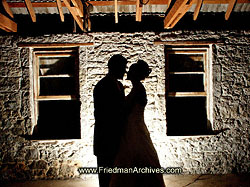 |
This shot took all of 10 seconds to set up. (Gotta work fast when you shoot weddings!) The flash was on the floor behind the couple facing the wall. |
 |
This was actually shot at night, with a flash, orange filter, and umbrella outside facing the window to simulate sunrise. This would have been a VERY difficult shot without the wireless capability since there was no place to run the wire to the outside. |
 |
The picture to the left is a truly remarkable image using only ONE FLASH, and again shows off the versatility of this flash system in automatic mode. The flash was placed BEHIND the model and over her shoulder, so that the bottom of the flash "beam" just touched her hair, and the majority of the beam hit the reflector placed out-of-frame, on the right. The right reflector was angled to reflect some of the light onto the model's face, and some of it to the reflector placed out-of-frame to the left. Read the text below to read more about (and see the studio setup of) how this shot was done.
|
 |
One flash, up and slightly to the left. The angle of flash can create a very dramatic feeling. |

|
One flash, one reflector. All digital. |
By Gary L. Friedman
I remember a time when Minolta was feeling unusually innovative - when it felt it could leapfrog past its competition and once again shake the world as it had done with the introduction of its SLR autofocus platform in the early 1980's. With the introduction of the xi-series of cameras, Minolta seemed to set for itself a very ambitious goal of turning their cameras into a Macintosh -- the user need not have known anything about photography in order to use them. Regardless of whether this goal was actually achievable (or even desirable! :-) ), the xi-series introduced the automatic zoom feature for “auto-composition”, the improved flash hot shoe, the little cards that would be inserted when a specific kind of picture was desired, and a wireless flash system that continues to be the best the industry has to offer. Although most of these xi-series innovations have faded away (apparently even Minolta's demographic didn't see the value in them), the wireless flash feature not only remains, but has been improved upon steadily over the years.
The thing that I find strange is the fact that Minolta doesn't seem interested in spreading the word about this very useful invention. You'll find little mention of their flash system emblazoned across their advertising, and even Minolta's newest instruction manuals do little to make this technology clear and understandable. When Canon finally caught up and introduced a similar wireless feature almost 9 years after Minolta’s introduction, they acted as if they were the first to do it, and few called them on it. Make no mistake; wireless flash is probably as important to location photographers as the invention of TTL (through-the-lens) flash was to the rest of us - a brilliant technology that makes perfect, off-camera flash exposures embarrassingly simple. If you're a budding studio photographer on a budget, the technology is no less important - it gives you the freedom and functionality of wireless at a significantly reduced cost.
This article aims to remove the shroud of mystery surrounding the wireless flash; to explain the technology, show some examples of its use, and to help the reader appreciate the newest improvements to the High-Speed Synch (HSS) flash system as implemented in the Maxxum 7 ("Dynax 7" in Europe). There are two methodologies for doing flash - one for film, and one for the newer digital sensors. The workings of each are so different that they will be explained in two different sections.
Just to demonstrate the dramatic changes that can occur from even subtle changes in lighting, below is a series of shots, showing one model and ONE FLASH using a multitude of flash positions.
|
|
Results of using flash in different configurations (all on automatic setting): a) On-camera flash (yuk!) b) Off-camera flash c) Off-camera flash with softening umbrella d) ONE flash over shoulder with two front reflectors (see text) – Wow!! |
The fourth shot is a truly remarkable image using only ONE FLASH, and again shows off the versatility of this flash system in automatic mode. The flash was placed BEHIND the model and over her shoulder, so that the bottom of the flash “beam” just touched her hair, and the majority of the beam hit the reflector placed out-of-frame, on the right. The right reflector was angled to reflect some of the light onto the model’s face, and some of it to the reflector placed out-of-frame to the left. This secondary-bounce light then illuminated the left side of the model’s face.
|
|
One-light setup for the last picture above. Flash is over shoulder, and two large white reflectors bounce the flash first to the right and then the left side of her face. Notice how the flash in the picture didn't throw off the exposure. |
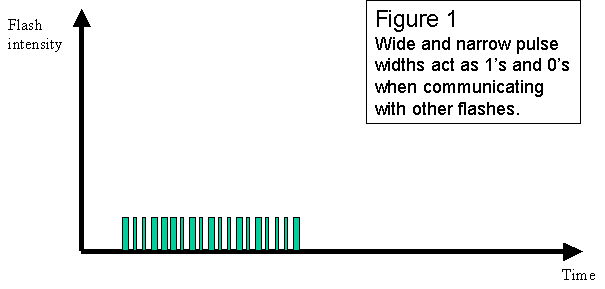
Minolta engineers have developed the ability to have flashes communicate with each other “in-band” – that is, instead of using radio, the flashes themselves can send tiny bursts of long-pulse and short-pulse light in a Morse-code-type scheme. (See Figure below.) These pulse widths are too low in intensity to significantly affect the final exposure, but strong enough to communicate with any other flashes in the vicinity – even when they are reflected off the walls, ceiling, or the subject. This scheme allows even the tiny pop-up flash to control several off-camera flashes at once without the need for cables. (This is a BIG DEAL if you've ever had to struggle with the cable method on a regular basis.) By generating long and short pulse widths of light at relatively small intensities, the camera's built-in flash can tell the other flash units when to start flashing and when to stop (based on how much light has hit the film).
Using this Morse Code communications scheme, the camera can also address flashes individually across 4 separate channels – for example, a typical wireless command might be structured like “Any flashes set to Channel 1, with 2:1 ratio set to :1, turn off NOW.” Having addressable flashes like this comes in very handy when two Minolta flash photographers are shooting in the same vicinity, and don’t want their wireless flashes interfering with each other.
The same circuitry that allows the flash to communicate in Morse Code also allows the flash to “spread out” the total light output by providing a steady stream of low-intensity bursts of light rather than just one large one. (See Figure below.)

This ability allows for two very
different features:
Amazingly, the Maxxum 7 has combined the ability to do HSS with off-camera flashes, something the Canon flash system still cannot do. This means you can shoot outdoors, wide open, and still have your remote flash expose everything automatically (see Figure 3 below for an example of this). This is actually quite a technical achievement, and someone should give Minolta an award for figuring out how to do this.
|
|
Maxxum 7 with 5600HS flash lets you shoot wide open on a sunny day (1/2,000th in this case) and still get the benefits of wireless flash. Here, the wireless flash with a small softbox was set to the left of the subject, who was standing in open shade. |
So, to review, here's what happens, from
the moment you press the shutter release to the moment the second curtain
closes:
An important feature of their wireless system does not appear in any manual: You CAN use multiple flashes on a subject, all on automatic, all placed wherever you please. In this scenario, the camera will issue the "all off" command as soon as it decides that the frame is well-exposed, REGARDLESS of whether the “proper” amount of light was the result of just one flash, or a combination of two or more flashes.
An impressive feature is the flash system’s ability to automatically balance more than one flash to produce a 2:1 illumination ratio without resorting to measuring distances or using flash meters. This is where things can get very confusing for most people, because not all options are supported by all camera bodies (or flashes), the way you invoke these settings is different for every body and every flash, and none of it is explained well in the literature.
There are two ways to do ratio flash. The first and most common is for the off-camera flash to provide 2/3 of the light, and for the on-camera flash to provide the remaining 1/3rd. This can be done using film cameras only; the inability to monitor lighting in real-time on digital precludes this automatic method. The Figure below shows a sample of this lighting technique.
|
|
This portrait used two unmodified flashes set to ratio mode – one off-camera (2:1), the other on-camera (2:1). Everything else on automatic. A good flash setup can make you look cute and adorable too! |
There’s another way to do 2:1 ratio with film, where BOTH flashes are off-camera. According to the official literature, this requires the use of a discontinued product, Minolta’s Infrared (IR) Wireless Flash Controller, which gets mounted on the camera’s flash shoe. In execution, the two off-camera flashes must be manually set to provide either 2:1 or 2:1, while the IR Flash controller is set to “Ratio” mode. Dramatic results can be obtained when both flashes are off-camera, and with little effort – no measuring distances, no using flash meters, etc.
|
|
Example of ratio flash using 2 off-camera flashes. The flash on the left was set to 2:1, the one on the right (which was equidistant) was set to 2:1). |
Technically, when using the IR Wireless
Flash Controller (WFC), the following sequence of events occurs when you press
the shutter release:
(It turns out there’s a better way to do off-camera ratio which Minolta doesn’t tell you about, and you don’t have to buy anything extra. AND it works with digital cameras. Read on later in this article for the secret!!)
I have created a very simple, portable and lightweight studio system using wireless flashes (see diagram below). Because I use three 5600HS flashes (two on the background, one as the key) and a white background (which can throw off any automatic exposure scheme), I usually put the flashes on manual, measure with a flash meter, and fire away. However, when I first started doing this with the digital camera, my images came out about 2 stops overexposed!
It turns out there were two culprits here, and the first was easy to explain: early digital sensors were simply hyper-sensitive to flashes, and I got my best results when I underexpose manual flash pictures by 1 stop as compared to the ideal setting for film. (This is no longer true, but it threw me off for a time.)
The second has to do with the subtle interaction between the wireless flash control signals and the flash meter. Because the flash meter is capable of capturing multiple flashes and displaying only the last one, the last “all off” control flash signal is indeed the reading that lingers, which can cause what you think is the reading to be off by two stops or more. The solution? Minolta’s obscure Infrared Wireless Flash controller (as mentioned earlier; designed for the 9xi and out of production) sends signals that the flash can see but the handheld flash meter cannot, so the meter captures only the flash burst you want to measure, allowing you to live happily ever after. Adding an infrared filter to the pop-up flash will solve the problem as well, and I've discovered that a piece of exposed and developed negative film acts as an ideal IR filter that can be cut and shaped to fit over the built-in flash.
Below are some samples of studio shots taken with 3 Minolta 5600HS (D) flashes, plus the studio layout used to take them.
| Studio shot using Fuji Superia film. |
 |
| Studio shot using Maxxum 7D. As good as film! |
 |

A very confusing part of the flash’s user interface has to do with the ‘controller’ function. What does it do, and why would you ever need it? Well, let’s start with the example of the built-in flash on most modern Maxxum cameras. The built-in flash can either:
act as a regular flash by setting the camera to automatic mode (this is the mode most people use it in)
act as a controller for off-camera flashes by setting the wireless mode to “WL Control”.
act as a ratio controller for 1 off camera flash, with the built-in flash also supplying 1/3 of the exposure light. This can be achieved by manually setting the wireless mode to “WL Control” and setting Ratio mode to “1” (as in the lesser of 2:1).
Well, larger flashes such as the 5400HS and 5600HS can do the same thing while mounted on the camera’s hot shoe. What is the advantage to using the on-camera flash for control signals rather than the pop-up flash? There's only one - the recycle time between shots is dramatically shorter if the larger flash is acting as a controller. (Might be moot if your off-camera flashes are still recycling...) The other reason you'd need one is if you own a 9xi film camera, which doesn't have a built-in pop-up flash.
Aside from those two exceptions, a big flash really ought to be used off-camera to take advantage of its power.
With digital cameras, the brilliant technique of reading light that's bounced off the film CANNOT be used because of the highly-reflective surface of the digital sensor. So, the time-honored tradition of utilizing a pre-flash to determine proper exposure is used instead. This means handy features like automatic ratio mode cannot be realized. When a flash picture is taken, the camera sends out a short pre-flash burst before the shutter even opens, and measures the intensity of the reflected light (plus the ambient light). The off-camera flashes are then told to output the correct amount of light in one large burst.
Here's how it works, in greater detail. This applies equally to both the Minolta and Sony Alpha DSLRs:
1) The built-in flash fires a "Morse code" that tells all flashes in the room to generate a short “pre-flash” of known brightness.
2) The pre-flash burst is reflected off of the subject, read by the camera's 14 matrix metering cells and compared against each other and any ambient light present.
3) The exact amount of flash brightness needed is calculated by the camera. If ADI is enabled and the flash is mounted on the camera and facing forward, the camera-to-subject distance is factored in as well. The camera communicates this brightness value to the off-camera flash(es) via another Morse Code pulsed flash message.
4) The aperture closes down, the mirror flips up, the shutter opens, and the camera’s built-in flash sends a Morse code command to all of the off-camera flashes telling them to “FIRE!” and output the previously-set flash burst.
5) All of the off-camera flashes fire with the proper intensity in a single burst.
6) The camera’s sensor may continue to collect light a little longer (depending upon if the exposure controls have been set to use a slow shutter speed), and then the exposure is finished.
If the flash is mounted on the camera shoe, the exact same sequence of events occurs, except that the communication between the camera and the flash happens through the contacts in the “hot shoe” and not through the Morse Code.
Below is a picture of what this camera-to-flash conversation looks like, using a Digital Storage Oscilloscope and two light-sensitive phototransistors. The top (yellow) channel represents pulses coming from the camera's pop-up flash; while the bottom (blue) channel is the off-camera flash's response.

On-camera or off-camera, the automatic
2:1 ratio feature for film cameras is a little constraining since it requires
you to use relatively slow (1/30th
of a second for Maxxum 9; 1/60th of a second for Maxxum 7) shutter
speeds and to manually set the flashes for their respective outputs (either
2:1 or 2:1).
Another approach exists which does not
require the WFC or putting the flashes into manual modes: simply put everything
on automatic and set up your two flashes on either side of your subject, placing
one flash the square root of two times as far away as the other. (The inverse square law applies here. See table below for other ratios and distances:)
|
Desired Lighting Ratio |
Set the fill flash this many times away from the subject as the main flash |
|
1:2 |
1.4 |
|
1:3 |
1.7 |
|
1:4 |
2 |
|
1:6 |
2.4 |
|
1:8 |
2.8 |
Here the correct exposure is determined by the combined intensities of all pre-flash pulses (chances are high it’ll be from the closest one), resulting in reduced light from the flash that is further away. This means you can even do 1:4 lighting (by moving the fill flash twice as far away from the subject as the main flash), and 1:6 ratio (by moving the fill flash the square root of six times further away than the main light). And it also means that you can shoot with any shutter speed you want when using HSS. What could be easier?
One of the advantages of using the Dynax
/ Maxxum digital cameras is that they can be used with the newest 3600HS and
5600HS flashes in wireless mode - either as a digital proof camera (to verify
correct lighting, ratios, and to see shadows), or to take the final product.
Below is a summary of the differences:
I have often joked that there are only two people in the world who understand the brilliance of the wireless flash system -- the guy who invented it, and Phil Bradon at Minolta USA. (Three if you count me, but I learned most of what I know from Phil. :-) ) But the fact is, very few Minolta (or Sony) flash owners who have read the manual would ever know about any of what I describe herein, or the different ways in which the wireless flash could be used. Hence this article - to explain to others what I have learned through trial and error, and to help offset the worldwide bias against Minolta by people for whom camera brands can be a religion.
About 9 years after Minolta introduced wireless flash, Canon introduced their own version, in which you can dial-in automatic ratios from 1:2 to 1:8. Drawbacks? The camera’s built-in flash (if it has one) cannot be used to trigger the off-camera flashes – You MUST put one of the $400 flashes on-camera to act as a controller. Also, Canon’s system does not do HSS with wireless – a feat so far only possible with Minolta cameras after the Maxxum 7 (including 7D and 5D and the Sony cameras) and 5600HS. Finally, it is rumored (I have not seen first-hand evidence of this) that Canon’s exposure system will get confused easily if the wireless flash is in the shot, whereas the Minolta implementation seems to be immune to this situation.
Compared to both Canon’s wireless solution and conventional wireless transmitters and radio slaves, Minolta’s pioneering solution continues to be the least expensive and the most versatile. Spread the word! And since you are now armed with this new technical insight, go forth and experiment!!!

 Like what you just read? My ebooks on Konica Minolta and Sony digital cameras provide a wealth of professional insights into ALL the cameras' features - and they're only about 20 bucks for an instantly-downloadable .pdf! Click here for a full list!
|
[1] The 'traveling slit' describes the camera's shutter when you're shooting above the camera's X-sync speed. Below the X-sync speed the shutter normally opens all the way, the flash fires, and then the 2nd shutter curtain closes. Above X-sync the 2nd curtain is dispatched before the first curtain clears the shutter window all the way, so what the film "sees" is a virtual slit which traverses the shutter window. A flash that goes off during this time will normally only expose the area of the film where the slit is rather than the whole frame. HSS was designed to eliminate this problem by providing low-level flash illumination for a very long time by flash standards - as long as 1/200th of a second.
Back to the Friedman Archives Home page